Thursday, March 31, 2011

A look back at the month of March


Well, March sure was a busy month.

We celebrated a very important birthday... Oliver's first!

Since he loves his rubber ducky, I created handmade invitations by placing
all of our ducks in a row.


The party decorations were crafted with the help of a ruffled addiction...


...and I built a cake that quacks out of
One bowl, Dairy Free, Egg Free Chocolate Cake.


We shouted, "Let's hear it for the boys!" when Oliver was sporting his customized shirt.


We had some great meals made with potatoes, cheese, and peameal bacon...


...and homemade No Knead Bread.


The Beach Bottles tutorial was quite popular and led to my first feature.


I shared some big news about...
 

source


I also shared some Mystery Marks...
...which were eventually Solved.


 We had the first Charcoal Reveal of the year...


...and, all in all, it was a month filled with Lovely Moments.


A lot of time was spent figuring out this new blog adventure of mine and I've enjoyed every minute of it.


Thank you for sharing the month of March with me!


Wednesday, March 30, 2011

One Bowl, Dairy Free, Egg Free Chocolate Cake

Okay, as promised, here is my Go To Chocolate Cake recipe.
It's the one that I used for Oliver's first birthday cake, which you can read about here.


You may be surprised to find out that this favourite recipe of mine is dairy free, egg free, and easy as pie... I mean cake... a very moist cake to be exact!
Its source is a Canadian cooking show called Best Recipes Ever.
You can check out their website here and this exact recipe here.

Easy Chocolate Cake

3 cups all-purpose flour
3 cups sugar
2/3 cup cocoa powder
2 tsp baking soda
1/2 tsp salt
2 cups of cold coffee or water
1 cup vegetable oil
2 tsp vanilla
3 tbsp cider vinegar

{Tip: if you don't have cider vinegar on hand, other types will do.  I've used white wine vinegar and red wine vinegar with success}


In an extra large bowl, whisk together flour, sugar, cocoa powder (sift into the bowl), baking soda, and salt.

Whisk in coffee/water, oil, and vanilla.

Stir in vinegar.

Bake in 350 degree oven until toothpick inserted into centre comes out clean.


A nice alternative to icing is freshly whipped cream and berries from the local farmer's market when they're in season.

Or pour on some chocolate ganache... 

{Easily made with pantry staples by putting 1 1/2 cups of semi-sweet chocolate chips into a bowl.  Bring 1 cup of cream (or 1/3 cup butter and 3/4 cup milk) just to boiling and then pour on top of chocolate chips.  Wait 5 minutes then whisk together.}

Another option is good old icing.  You can find my favourite recipe here.
Sometimes I cut back on the confectioner's sugar a little bit and omit the vanilla - just adjust to your liking.


This frosting recipe works great for decorating cookies too and the consistency can be altered by adding more or less milk.

Enjoy!

Thanks for dropping by.


I've shared this with...


Tuesday, March 29, 2011

A charcoal reveal


It's finally finished.

My first drawing of 2011 is complete!

charcoal on paper . 18 x 24 . 2011


Let's take a look Behind the Easel.


I used a couple of my bird trinkets as a reference...


...and began to sketch in the basic bird shapes with Willow Charcoal.

 
Next, I started to shade in the background by using the side of the Willow Charcoal stick and then blending.


Then I started adding to the darker areas with Compressed Charcoal...


...and then Black Conte.


With this drawing, I wanted to try something a little different by incorporating some pattern.
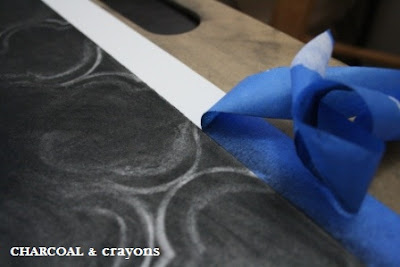
I cut a template out of card stock.


And drew around it using a retractable eraser stick.


The pattern was inspired by the design on the ottoman in my son Oliver's nursery.


Time to remove the painters tape...


...revealing a nice white border for easier handling and framing.


Here's another look at the final piece...


Well, what do you think?
Let me know below.

The working title for the drawing was "Feathered Trio".
I'm not sure if I want to keep that title or change it.

Have any suggestions?  What do you think I should call this drawing?

All comments and criticisms are welcome!


Thanks for stopping in.


I've shared this at...

Good Life Wednesdays

Monday, March 28, 2011

I've been featured!


Do you love all things...

Coastal, beachy, and nautical?


Well, I do!

And if you're like me, you'll find tons of inspiration at...

Sally Lee by the Sea

I am so honoured that they've featured my little project of turning plain glass jars into Beach Bottles here.


Thanks for dropping by.


Want to play Shuffle Stuff with me?

Well, we've avoided a crisis.

We arrived home Saturday evening, after being away for 6 days, only to discover that we'd left behind the power cord for our laptop... and its battery was dead.

Would we be able to survive computerless while waiting for it to be mailed back to us?

source


Thank goodness we didn't have to find out.
We found a universal cord at the local electronics shop.

Crisis averted!

source


Since we were away this week, I was unable to work on Project Simplicity.


Better late than never!
So once the suitcases were unpacked, the washer and dryer were humming along, and the fridge and pantry were restocked... I could focus on...

Hot Spot # 3 : Kids Clothes & Toys

Oliver's wardrobe is one area that I have been bound and determined to keep on top of.
Back when I was pregnant and waiting for little Ollie, I washed and sorted all of the tiny outfits that we'd so generously been given.

source
 
It was then that I gave myself the goal that he would wear everything at least once.
And so far so good.

As Ollie grows out of his clothes, I store them away into bins in the closet and move the next size up from the bottom drawer of his dresser.


Now, toys are a different story.

As Oliver grows, so does his collection of toys.
And since our home of the moment (new house is less than a month away!)
is a tiny rented condo, space is a little bit of an issue.

Please note all of the stuff around the closet instead of in it.


Most days, I feel like I'm playing a game which I like to call "Shuffle Stuff".


The rules are pretty simple. 

1.  Shuffle stuff between baskets and bins and boxes and drawers.
2.  Shuffle piles of stuff from one room to another.
3.  Shuffle stuff to get to the other stuff that you need.

And make sure that the stuff that you need is at the back of a closet behind layers and layers of stuff and more stuff!


Well, I've tackled that stuff by giving it away, throwing it away, and packing it away.

Here's the result...


Please note the lack of stuff around the closet.

I had a successful round of Shuffle Stuff with this bin underneath the crib...


...and this little basket...


Today's game of Shuffle Stuff turned out rather well...

...in fact...

I think, for a change...

I won.


Thanks for stopping by.


Have a peek at other Hot Spot # 3 results here.

Friday, March 25, 2011

Let's hear it for the boys!

When the boys shirt contest called "Let's hear it for the boys!" was announced over at I Am Momma - Hear Me Roar, I knew that I wanted to create something to submit.
I also knew that I wanted to incorporate images inspired by this little poem...
What are little boys made of?
Snips and snails
And puppy-dogs' tails,
That's what little boys are made of.
This is what I came up with...


...and it was super inexpensive too!

Materials
  • plain boys shirt - on clearance for $3
  • embroidery floss - .39 cents per little pack
  • left over canvas from previous projects - free
  • canvas coloured thread courtesy of my mom - free

Tools
  • scissors
  • pencil
  • fine and ultra fine tipped sharpie markers
  • pins
  • embroidery needle
  • sewing machine

Here's the how to...

1.  Cut and rip the canvas into patches of the size and shape that you desire.


2.  Draw onto the canvas with sharpie markers (use pencil first, if you like).


3.  Pin the patches to the shirt.


4.  With the canvas coloured thread and a sewing machine, sew the patches on.

{Initially, I skipped this step and just sewed the patches on with the embroidery floss.  Then I started to get worried about the edges fraying too much so did this step at the end.  Thanks Mom for your input and help!}

5. Add decorative stitches around the patches with embroidery floss.


6.  And some X's placed here and there.

Here's another look at Oliver in his new shirt...


Don't need a hat indoors, Mom!


That's better!


Thanks for dropping in!


Have a look at some other amazing boys shirts here.

    I've shared this post with...