Monday, October 31, 2011

Day 31: Our Halloween Home

Tonight on this Halloween evening, we had a visit from a delightful dinosaur...


He was quite polite and instead of proclaiming "Trick or Treat", he shouted "Please!"


As bedtime drew near, he traded in his dino green for a devilish red suit.
And even though the matching hat made a mess of his hair...


...our little devil still had a few tricks up his sleeve!


 Now before we turn out the lights, let's take one final look at Our Halloween House...


...complete with Spooky Spider Silhouettes and pumpkins with A Little Bit of Magic...


 And although I absolutely love our house...


"What I love most about my home is who I share it with."

- Tad Carpenter


Sweet dreams and thanks for stopping by.


This post is part of my blog series, "31 Days of Words to Live By".  For the month of October, I will be sharing my favourite quotes and sayings while incorporating them into daily life and art projects.

This series was inspired by The Inspired Room, where you'll find other "31 Days" series among many other wonderful things!


Day 28: Shoot for the Moon
Day 30: A Little Bit of Magic
Day 31: Our Halloween Home


.

Sunday, October 30, 2011

Day 30: A Little Bit of Magic


"Those who don't believe in magic will never find it."

- Ronald Dahl


Around this time of year, there's something just a little bit magical about a pumpkin.  After picking the perfect specimen from The Pumpkin Patch and bringing it home, the real enchantment begins.


Daddy gets to work...


And so does Oliver...


Seed sorting...


And seed tasting...


This year, the task of carving was left for me.  Daddy wanted the Guinness logo, I opted for a simple star treatment on mine, and Ollie's pumpkin was destined for a car, of course.
Then it was time for the most magical part...


Guinness Logo Jack-o-Lantern


Cars and Stars Jack-o-Lanterns


 Pumpkins, creativity, family, love, ... whatever it may be... I hope you find the magic that you believe in.


 Thanks for dropping by.


This post is part of my blog series, "31 Days of Words to Live By".  For the month of October, I will be sharing my favourite quotes and sayings while incorporating them into daily life and art projects.

This series was inspired by The Inspired Room, where you'll find other "31 Days" series among many other wonderful things!


Day 28: Shoot for the Moon
Day 30: A Little Bit of Magic


.

Saturday, October 29, 2011

Day 29: Happiness Is Cheesecake


"We tend to forget that happiness doesn't come as a result of getting something we don't have, but rather of recognizing and appreciating what we do have."

- Frederick Keonig


Well, what I do have is cheesecake.  Pumpkin Praline Cheesecake, to be exact.
And it sure does make me happy.

I found the recipe in the Kraftfoods What's Cooking magazine, Fall 2011 issue.  I've never attempted cheesecake before, but decided to give it a try.  I'm glad I did!


Here's the recipe... it just might bring you a little bit of happiness too...


Pumpkin Praline Cheesecake


INGREDIENTS


Cheesecake
 
3/4 cup Graham Crumbs (I like to buy the crackers since we can use them for other things, then just chop into crumbs in the food processor)
1/2 cup finely chopped pecans (once again, food processor works like a charm)
3/4 cup packed brown sugar, divided
3/4 cup granulated sugar, divided
1/4 cup butter, melted
1-1/2 cups canned pumpkin
3 eggs
1-1/2 tsp. ground cinnamon
1/2 tsp. ground nutmeg
1/2 tsp. ground ginger
3 pkg. (250 g each) Brick Cream Cheese, softened
1 Tbsp. cornstarch
 

Praline
 
1/2 cup granulated sugar
2 Tbsp. water
1/2 cup chopped pecans


DIRECTIONS


Cheesecake:

  1. MIX graham crumbs, nuts, 1/4 cup each brown and granulated sugar, and butter; press onto bottom of 9-inch springform pan. Refrigerate 1 hour. 
  2. HEAT oven to 350ºF. Whisk pumpkin, remaining brown sugar, eggs and spices until well blended. Beat cream cheese, remaining granulated sugar and cornstarch in large bowl with mixer until well blended. Add pumpkin mixture; mix just until blended. Pour over crust. 
  3. BAKE 45 to 50 min. or until centre is almost set. Run knife around rim of pan to loosen cake; cool completely before removing rim.
  4. REFRIGERATE for 4 hours. Meanwhile, prepare Praline.

Praline: 

  1. BRING sugar and water to boil in small saucepan on medium-high heat, stirring constantly. Continue boiling, without stirring, 5 to 7 min. or until syrup is thickened and golden brown.
  2. REMOVE from heat. Stir in nuts.
  3. SPREAD onto parchment-covered baking sheet. Cool.
  4. BREAK into bite-size pieces.  

TOP cheesecake with praline and whipped cream just before serving.


A few of my mistakes to avoid...

Please put a pan or cookie sheet under the cheesecake while baking.  I didn't and now have an oven that requires some serious cleaning.

I refrigerated the cheesecake between 2-3 hours instead of 4.  So it was still a little soft in the centre.

Also, don't top the entire cheesecake with the praline, like I did.  The praline is like a hard candy and makes for difficult cutting.  Although it won't look as pretty when displayed on the cake plate, next time I'll probably top each piece separately after cutting.


Mmm... a piece of cheesecake happiness. 


What makes you happy?


Thanks for stopping by.

This post is part of my blog series, "31 Days of Words to Live By".  For the month of October, I will be sharing my favourite quotes and sayings while incorporating them into daily life and art projects.

This series was inspired by The Inspired Room, where you'll find other "31 Days" series among many other wonderful things!

Check out the complete series.


I'm sharing this with...

Tip Junkie handmade projects

Friday, October 28, 2011

Thursday, October 27, 2011

Day 27: Spooky Spider Silhouette


"Darkness cannot drive out darkness; only light can do that.
Hate cannot drive out hate; only love can do that."

- Martin Luther King Jr.


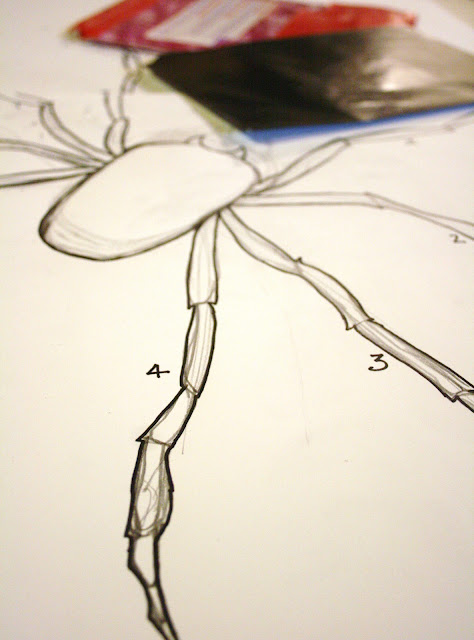
This year for our outdoor Halloween decor, I've decided to utilize light.  Orange tissue paper and card stock paper have transformed our front door window into a Spooky Spider Silhouette...


I was inspired to create this after seeing Halloween Window Clings for sale in one of the weekly flyers.


Trace & Transfer
Once my spider was drawn out in pencil, I went over the outline with a Sharpie.  Using carbon paper (available at any office supply store), I traced and transferred the image onto pieces of card stock (I didn't have black so used dark blue instead). 


Cut!
Time to cut out all those wiggly legs.  Stacking 2 - 3 pieces of card stock together is a quick way to make multiple spiders.


Trim & Tape
I found it easiest to tape and trim the orange tissue paper right on the window, rather than measuring and pre-cutting.


Give It Some Glue
Tape the legs to the body of the spider and coat one entire side with a glue stick.


Stick That Spider
Place the spider onto the orange tissue paper and smooth down...


Inside View


When Darkness Falls
Wait until it is dark outside and then turn on your inside lights...


Outside View


...and let your Spooky Spider Silouhette shine...


I'm working on doing our upper front windows too.  That way, our whole house will have an eerie glow!  Stay tuned for more photos...


Thanks for dropping by.


This post is part of my blog series, "31 Days of Words to Live By".  For the month of October, I will be sharing my favourite quotes and sayings while incorporating them into daily life and art projects.

This series was inspired by The Inspired Room, where you'll find other "31 Days" series among many other wonderful things!


Day 27: Spooky Spider Silhouette
.

Wednesday, October 26, 2011

Day 26: Homemade Thin Crust Pizza Dough & Sauces


Ideas are like pizza dough, made to be tossed around.

- Anna Quindlen


Ever since reading the Summer 2011 issue of Cottage Life, I've been wanting to try Kris's Pizza Dough recipe on page 77.  Well, today I did... and the result was fantastic!


I modified the original recipe slightly by incorporating whole wheat flour.  Here's my version...


Pizza Dough

4 tsp active dry yeast
1 cup lukewarm water
1 tsp vinegar
2 cups all-purpose flour (plus extra as needed)
2 cups whole wheat flour

1 tsp salt
1 tsp sugar
1/3 cup olive oil (plus extra to coat dough and tray)


  1. In a small bowl, dissolve yeast in warm water and vinegar. Set aside for about 10 minutes, until mixture bubbles. Meanwhile, in a large bowl, sift flour, salt, and sugar.
  2. Make a well in centre of flour mixture. Stir in dissolved yeast and olive oil. Turn dough onto a lightly floured surface. Knead until smooth and slightly tacky, about 6–8 minutes. Add some extra flour (as much as 1 cup if dough is too sticky to work with).
  3. Roll dough into a ball. Coat with 1 tsp olive oil, place in a bowl, and cover with a clean tea towel. Let rise in a warm spot until doubled in size, around 30–45 minutes.
  4. Knead dough a few times and divide into 4 portions. Shape each portion into a ball; place on an oiled tray. Cover and let rise again until almost doubled in size, around 30–45 minutes.
  5. Preheat oven to 400°F. On a lightly floured surface, roll one portion of dough to desired thickness. Add sauce and toppings (don’t overload).  Place on a pizza pan or cookie sheet. Bake on the middle rack of oven for 15–20 minutes, or until crust is golden and cheese is melted.
  6. While each pizza is cooking, roll out and top the next one.


Make your own frozen pizzas too...
I decided to cook 2 pizzas and freeze the other 2.  Once rolled out and covered in sauce and toppings, I wrapped the pizzas destined for the freezer in a few layers of plastic wrap.  I'd wrap in tin foil as well, but our grocerystore was all out!  Placing the pizzas on cookie sheets in the freezer keeps them flat until they freeze. 


Now, on to the sauces...


For my red pizza sauce, I modified THIS recipe to our taste and ended up with this...


Red Pizza Sauce

1 can tomato paste
3/4 cup warm water
1 tblsp parmesan cheese
1/4 tsp onion powder
1/4 tsp garlic powder
1/4 tsp oregano
1/4 tsp basil
1/4 tsp honey
pinch cayanne pepper
pinch fresh ground pepper


  1. In a small bowl, combine tomato paste, water, parmesan cheese, onion powder, garlic powder, oregano, basil, ground black pepper, cayenne pepper.
  2. Let sauce sit for about 30 minutes to blend flavors
  3. Spread over pizza dough and prepare pizza as desired.


I love pizza with a garlic or white sauce.  So I revamped THIS recipe and came up with this...


Garlic Butter Pizza Sauce

2 tblsp butter, melted
2 tblsp olive oil
1 tblsp chopped garlic
1 tblsp parmesan cheese
1 tsp dried basil
1 tsp dried oregano


  1. In a small bowl combine butter, olive oil, garlic, basil, oregano and parmesan cheese.
  2. Let sit for at least 10 minutes and it will start to thicken.
  3. Spread mixture evenly on pizza dough and prepare pizza as desired.


Topping combinations are endless and homemade pizza night is a great way to use up what is in the fridge.  We used various combinations of leftover chicken from The Ultimate Roast Chicken, sauteed onions, bacon, spinach, and olives.


So good, that only 3 pieces were left...


...The perfect lunch for tomorrow.


Thanks for stopping by.


This post is part of my blog series, "31 Days of Words to Live By".  For the month of October, I will be sharing my favourite quotes and sayings while incorporating them into daily life and art projects.

This series was inspired by The Inspired Room, where you'll find other "31 Days" series among many other wonderful things!


Day 26: Homemade Thin Crust Pizza Dough & Sauces


I'm sharing this with...


Tip Junkie handmade projects