Showing posts with label Birthdays. Show all posts

Friday, March 25, 2011

This cake really quacks

Wow - it's been a busy few days!
Oliver is now officially one year old.
We celebrated this milestone with the Rubber Duck Potluck.
It was a great day and Thank You to all who came out and made it happen!

Want to have your own Rubber Duck themed party?
Well, you'll need a duck cake, of course.


I made this one for Ollie's special day and I am so happy with how it turned out!

Here's the how to...

1.  Bake some cake!
I baked mine the evening before decorating day.  It worked out great because they had plenty of time to cool overnight and it broke up this somewhat overwhelming task.

If you don't have a go to chocolate cake recipe, take a look at mine here.

These are the cake shapes that you'll need...
a 9x13 rectangle, a 9" circle, a 10" or 11" circle, and one baked in a small oven safe bowl (for the head).


2.  Whip up some icing.
I ended up using 3 batches (find the recipe here).
I used food colouring to create blue, yellow, orange, and green.


3.  Let's start assembling with the base.
I used an upside down cookie sheet covered in foil.


4.  Flip your 9x13" rectangle onto the base.

{Tip: if you line the baking dish with parchment paper, this is easier - and clean up is a breeze.}


5.  Time for some blue icing.

I didn't need to do a crumb coat since everything was nice and smooth and... well, crumbless.  I think this was due to the parchment paper.
I drew wave like texture into the icing.


6.  Next, start creating the duck by placing the smaller 9" round cake and frosting the top.  It doesn't really matter what colour because you won't see it until you cut the cake.


7.  Place the larger 10" or 11" round cake on top.


8.  Now, we need to add a tail.  I made mine out of rice krispies treats.  To save on time, I used the already made, pre-packaged ones...

Shape into a tail and use icing as glue to place onto the cake.

{Tip: also use toothpicks to secure - I had some tail drooping issues with the weight of the icing and had to add some toothpicks at the end.}


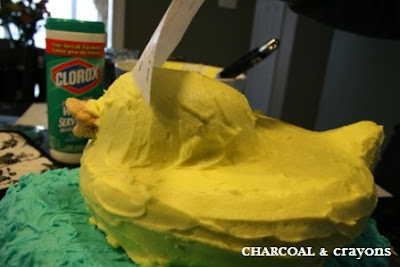
9.  Do a crumb coat with yellow icing.


10.  Add the head with the cake that was baked in a bowl and a beak shaped out of rice krispies treats (use toothpicks).


11.  Crumb coat the head.

I chilled mine at this point for a little bit.


12.  Next, add a final top layer of yellow icing.


13.  Smooth out some areas, like the head, using the edge of a piece of paper.


14.  Draw some texture into the icing for the wings.


15.  Cover the beak with orange icing.  Draw on eyes with a piping bag - I used white and green icing.  I also piped blue icing around the base of the duck and the base of the blue rectangle.


And there you have it...
a cake that quacks!

Thanks for stopping by.


I've linked this post to...


Funky Junk's Sat Nite Special


Join  us Saturdays at tatertotsandjello.com for the weekend wrap 
 up           party!

UndertheTableandDreaming


Visit thecsiproject.com

Tuesday, March 22, 2011

Chocolate cake factory

This year, my husband gave me an awesome birthday present... a trip to Ikea!
He asked me if I could find anything there for around $75... um... could I ever!

Among some other things, I picked up this bright beauty...

Source: Ikea

And this spectacular ruffled blanket...

{it's made from the same fabric as the scarf that I received at Christmas from my mother-in-law, Robin - she has great taste!}
Source: Ikea

Best birthday present ever!
Now, it's time to get ready for Oliver's birthday... it's his first one.

Chocolate cake, anyone?


Thanks for dropping in.


Monday, March 21, 2011

A ruffled addiction


a beach cottage


I was inspired to learn how to make these...


They're something different to decorate with for Oliver's first birthday party... which is just a good excuse to make them.
Since I had never made them before, this video helped me learn how.

A warning of CAUTION before you attempt this project - it is highly addictive... you might not be able to stop making them.

Here's the how to...

1.  Gather your supplies.
  • tissue paper
  • scissors
  • stapler with staples


2.  Spread out 8 - 10 sheets of tissue paper - I personally prefer 10.


3.  Fold it accordion style.  Staple at the centre.


4.  Cut the ends into a rounded shape.


5.  Spread out.


6.  Gently pull each sheet towards the middle.  First on the one side...


...then on the other side.


Repeat until you've pulled up 5 on each side (if you're using 10 sheets - 4 on each side if you're using 8 sheets).


7.  Flip over...


...and repeat on this side.


8.  Fluff and primp until you're satisfied.


They're just so lovely...


Light, airy, dreamy ruffles...


Thanks for stopping by.


Thursday, March 3, 2011

All of our ducks in a row

It's hard to believe that Oliver is turning one this month.

To celebrate this milestone,
we will be heading back to our hometown...

 ...and that is where we will have...

 The Rubber Duck Potluck!

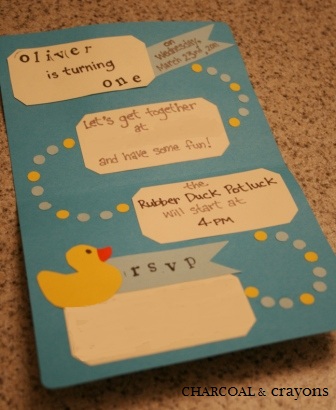
I've been working on the invitations these past few days.


It's turning out to be quite the ambitious project!

I didn't want to use elaborate or expensive materials since most people will end up throwing them away, which is a good thing.

-  I love to get rid of clutter too!

So I'm creating them entirely out of coloured card stock...
and using a lot of tools to make it happen.


Just in case you're thinking of doing something similar,
here's a list of what I am using...

Materials
  • card stock
  • envelopes

Tools
  • scissors
  • rotary cutter
  • straight edge
  • cutting mat
  • pencil & markers
  • alphabet stamps & ink pad
  • glue stick 
  • hole punch
  • husband to operate hole punch

Here are a few of my favourite snapshots of the process so far...


Hopefully another day or two and they'll be finished.

Then on to the next project...

...making a cake look like a duck.

Thanks for stopping in.

Wednesday, March 2, 2011

Sneak Peak


Just thought I'd give you a sneak peak of a little project
that I've been working on...


More to come - possibly tomorrow.

Thanks for dropping in.